Heater core?
 06-12-2008, 12:29 PM
#1
Registered User
Thread Starter

Join Date: Jun 2005
Posts: 16
Likes: 0
Received 0 Likes
on
0 Posts
Heater core?
I've got a leaking heater core. Started getting the fog on the windshield. I searched several posts and sounds like it may not be to bad of a job to do myself, but didn't find any step-by-step instructions. Can anybody point me to them?
Don't know if it makes a difference but I've got a 2000 4x4 Automatic.
Don't know if it makes a difference but I've got a 2000 4x4 Automatic.
 06-12-2008, 01:38 PM
#2
Registered User
Join Date: Dec 2006
Location: Greenville, IN
Posts: 839
Likes: 0
Received 0 Likes
on
0 Posts
Do a search it's been covered here before quite a few times. I did one last winter in my truck. You got screws up by the windshield and then pop the trim pieces off. Lower the steering wheel and then a few little bolts and the whole dash starts to lean back. The you start unplugging stuff as you go along. It's really not that bad.
06-12-2008, 02:41 PM
#4
Just a plain ole guy

It's inside the same box as the ac evaporator coil. Meaning your ac will have to be discharged to get to it. I did my own. Mine was an ac repair job. it's not a hard job, but you really need to take your time. I had a spare care for two weeks so I did mine over several evenings.
You will make a foolish mistake if you don't change the ac evap core and accumulator while your in there. They are bad about leaking and if it does, your going to do it all over again.
My entire job costs about $350 in parts. I had a vacum pump and freon allready. This included the little tool set to open the ac lines and a set of ac gauges. A shop wanted $600-800 to change just the evap core.
06-12-2008, 03:05 PM
#5
Registered User
Join Date: Jun 2007
Location: south jersey
Posts: 62
Likes: 0
Received 0 Likes
on
0 Posts
funny that you post that now, cause my truck is in the garage right now as i am replacing the evaporator. if you can get it done for $600 like charliez said, i would go that way, cause right now i'm dreading putting it back together. everything is apart and its a huge mess. wish i was a little neater about it, but i had no clue it would be this bad, there are a ton of wiring harness that come apart millions of different ways, about ten times more tiny little screws and bolts and they are all hard to get to and hard to reach, let alone the fact that the dash is $400 from dodge if you crack it trying to get to the stupid little backwards mounted screws up by the windshield. its a good thing my dash already had a few 4-5" diameter holes in it and i planned on replacing it, otherwise it would have been even more of a headache.
06-12-2008, 04:10 PM
#6
Registered User

Join Date: Nov 2006
Location: Saltspring Island BC Canada
Posts: 136
Likes: 0
Received 1 Like
on
1 Post
You can buy a heater core that has rotating tubes to make the install way easier IE not draining the A/C system, NAPA sells them I did mine 2 months ago about three hours start to finish, I did not change the evaporator, It may bite me in the butt down the road but with less than 100000 miles I took a chance. Have a piece of rope handy to hang the passenger side of the dash up with the handle above the door makes it much easier. Also watch out for the metal studs that go through the firewall they are slid into place on the back of the HVAC unit when you slide it back they can fall out. This is what caused me the most trouble 45 minutes just to get them back in place. 

Trending Topics
06-13-2008, 12:12 PM
#8
Registered User
Thread Starter
Join Date: Jun 2005
Posts: 16
Likes: 0
Received 0 Likes
on
0 Posts
Thanks guys,
I did see one about the evaporator, so if I can find that one again, that should get me started. Hmmm? Now the decision on the evaporator core. I've got 225K miles on the truck and I think the original may still be in there. I don't remember ever having it replaced. Maybe I've got a good one that I should leave in there? Or is that just BAD logic?
I did see one about the evaporator, so if I can find that one again, that should get me started. Hmmm? Now the decision on the evaporator core. I've got 225K miles on the truck and I think the original may still be in there. I don't remember ever having it replaced. Maybe I've got a good one that I should leave in there? Or is that just BAD logic?
06-18-2008, 06:36 PM
#9
Registered User
Thread Starter
Join Date: Jun 2005
Posts: 16
Likes: 0
Received 0 Likes
on
0 Posts
Mine's done.
I got most of my info from this thread:
https://www.dieseltruckresource.com/...d.php?t=165900
I ended up only replacing the heater core. Here is a slightly more detailed description of how to do only the heater core without disconnecting any A/C lines:
UNDER THE HOOD
1. Disconnect Batteries 2. Remove Air Cleaner Assembly 3. Unbolt Dryer from firewall, but do not disconnect any A/C lines 4. Remove Computer from firewall 5. Remove bolts from Computer Bracket (the 2 on the right side of the bracket are heater box studs that hold the heater box on the firewall 6. Disconnect Htr Hoses at engine block and use compressed air to drain Htr Core (hoses can be left attached to Htr Core, they will fit through firewall) 7. Remove two (2) 11mm nuts from Htr Box studs (one behind the engine valve cover and one behind the Computer bracket)
NOTE: so far you�ve removed 4 nuts holding the heater box on the firewall ( 1 above the dryer, 1 at the bottom of the dryer, 1 behind the computer, and 1 behind the valve cover)
DASH REMOVAL
1. Remove the Glove Box and Disconnect two (2) electrical connections on the Htr Box and the Radio Antenna 2. Remove the plastic cover below the center of the dash and bracket behind it holding some electrical thing (sorry don�t know what this is) 4. Remove six (5) 5/16" (actually I think these were 8 or 10mm, I think I only used 8,10,11,13 and maybe a 15 / 17mm sockets and wrenches for this job) screws from across the top of the Dash 5. Remove the Panel under the Steering Column 6
if you have an AUTO trans and a gear posn indicator disconnect the small cable or it WILL get broken 7. I didn�t disconnect the Vacuum Line for the Htr Box above the Throttle Pedal 8. Remove two (2) nuts on studs that holds the Steering Column and set the Steering Column in the drivers seat 9. Remove the driver and passenger side Kick Panels 10. Loosen the bolts behind the Kick Panels for the Dash (hold on to Dash, it is loose now) and roll it towards the seats 11. Lift the passenger side of the Dash off of the lower bolt and set it back against the seat (this will make room to work on the Htr Box)
HTR BOX REMOVAL
1. Remove the ground strap above the Htr Box from the FIREWALL 2. Remove the 10mm nut near the passenger A-Pillar from the stud holding the Htr Box (I had trouble finding this one � it�s in the top right corner of the heater box) 3. Remove the 10mm nut above the Htr Box where the ground strap came off 4. On mine, there was a second nut behind the ground strap holding the box to the firewall. I didn�t see it and wasted a lot of time. 4. Pull the heater box in away from the firewall It will only pull away a few inches because the A/C lines / dryer are still attached, but it�s enough. 5. Use a Phillips screwdriver to remove the 2 remaining bracket holding the tubes in place 6.. At this point I used a hacksaw to cut off the 2 tubes to get them through the firewall. 7) Heater core just pulls up out of the box.
RE-ASSEMBLY
1) Install the new heater core by placing the bottom left corner into the box (core is cocked toward driver side and moveable tubes near the hole where they go through the firewall. 2) Gently and slowly rotate the core clockwise keeping the tubes near the hole in the firewall. The core should drop down into the box.
Perform everything else in reverse order. Ensure Htr Box functions properly prior to re-installation. Take care not to kink Vac line on Htr Box when it goes back through firewall. Also, on mine, the stud at the bottom of the dryer fell off of the box. It was a pain to get it back into place. I had another set of hands to help me get the box back in place. That would be have been pretty tough to do alone. Like Busboy said in the other thread, "TAKE YOUR TIME" and don't force anything. GOOD LUCK!
06-20-2008, 09:23 AM
#10
Just a plain ole guy
It seems there's been several threads on this lately. And you see one set of folks who know how to roll the dash down and swing the passengers isde away and get the job done easily and another set that don't have this knowledge and take every little part of thier dash off. Is there a way we can get the instructions somewhere easy to find, and then when the question gets asked again, we will have one thread we can direct the poster to?
The above instructions are fine. It's just what I did and it works. Maybe just add a note to always do heater core, evap core, and accumulator to prevent a return trip. Also maybe mention the little tools to seperate the ac lines and to have the ac discharged and recharged correctly. Maybe we can help a brother out.
The above instructions are fine. It's just what I did and it works. Maybe just add a note to always do heater core, evap core, and accumulator to prevent a return trip. Also maybe mention the little tools to seperate the ac lines and to have the ac discharged and recharged correctly. Maybe we can help a brother out.

 02-21-2009, 08:07 PM
#13
Registered User
Join Date: Feb 2009
Location: San Jose, CA
Posts: 5
Likes: 0
Received 0 Likes
on
0 Posts
I just did mine using these very good instructions. i took a few pics, hope this helps people a little more.
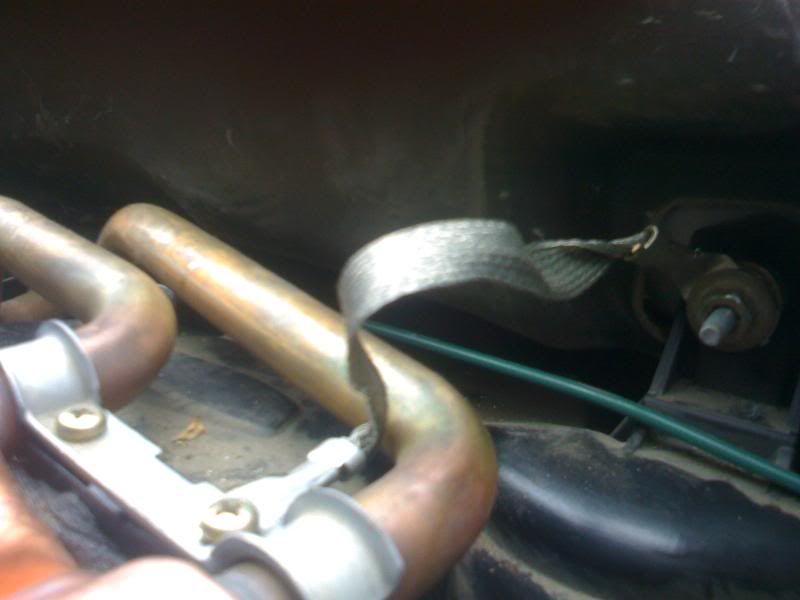
i did use a strap to hold up the dash, i just took this pic as i was about to put it back on..

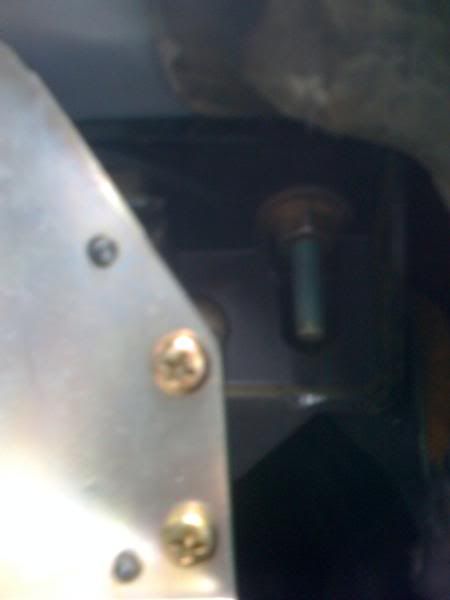
heres the 10mm nut of the heater box next to the passenger A-pillar, its a tight sqeeqe
and the grounding strap in the heater core... there are two nuts one one both sides of the grounding strap so dont forget to take both of them off.
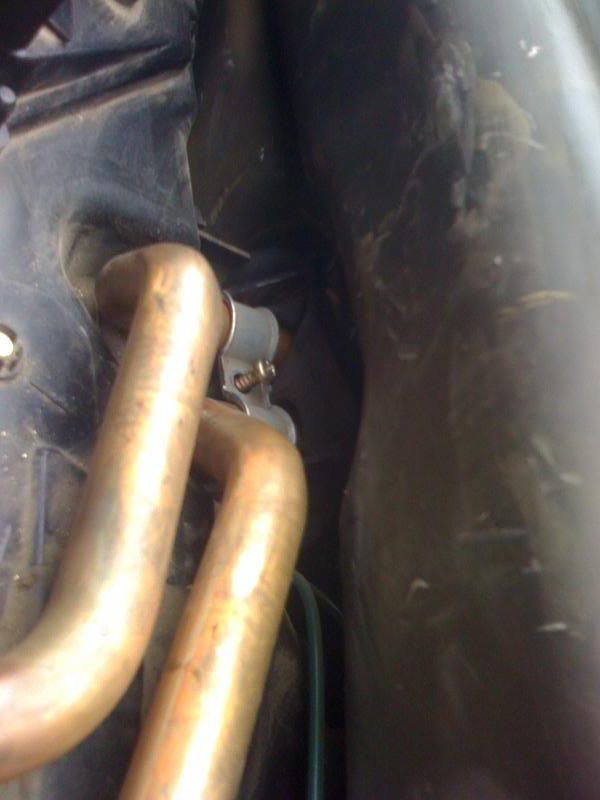
heres where the antifreeze comes in through the fire wall, i cut this piping with a sawzaw to get the core out easier.
i did use a strap to hold up the dash, i just took this pic as i was about to put it back on..
heres the 10mm nut of the heater box next to the passenger A-pillar, its a tight sqeeqe
and the grounding strap in the heater core... there are two nuts one one both sides of the grounding strap so dont forget to take both of them off.
heres where the antifreeze comes in through the fire wall, i cut this piping with a sawzaw to get the core out easier.
02-22-2009, 07:44 PM
#14
Registered User

Join Date: Jul 2004
Location: Montana
Posts: 313
Likes: 0
Received 0 Likes
on
0 Posts
Change core
I just got done installing a new heater core,got the aluminum one with the swivel ends,heres what i did,dropped the steering wheel to the seat, took out the air bag controller on the hump,4 bolts,3 nuts, 5 bolts next to the windshield,took the kick panels off,loosened the bolt on both sides,rolled the dash back and swung the right side off the bolt and set the dash on the seat,tied it back to the seat with a bungi cord,took a air power little angle grinder with a metal cutoff blade(2 inches) and cut the tubings a inch and a half after the first bend of the core,lifted out the the old core straight up, took the new core and cut the tubings same place as the old one,maybe 1/2 in shorter,droped the core in the slot,put 2 inches of 5/8 heater hose to couple the new heater core pipes with the old part of the pipes still in the truck, used 2 clamps on each hose,never moved or unbolted the the heater/ac unit at all, didnt even open the hood of the truck,put everything back together,fired up the Espar so it pumped the coolant thru the new heater core,added a little anti-freeze, fired up the truck,took it for a 10 mile run on the high-way, its 18 below zero out with a 40 mph north west wind at the moment,blows air like it did when it was brand new, maybe even better,this new core has twice as many tubes in as the old one,dont kno if that is good or bad, didnt drain any coolant out either,when I cut the pipes, lost maybe a few ounces,rest stayed in the core,didnt spill any cause I lifted the core straight up. old core was copper,new one was aluminum,good or bad,dont know,dont care cause I have heat, actual time start to finish-2 hours,but did spend 2 more hours looking for wrenches,clamps,lights,visiting,having a coke,more important things like that.
02-22-2009, 07:46 PM
#15
Registered User
Join Date: Jul 2004
Location: Montana
Posts: 313
Likes: 0
Received 0 Likes
on
0 Posts
update last Dec.
Dodge Demon
Registered User Join Date: Jul 2004
Location: Montana
Posts: 285
If I was to do it again i would make one change to what I done,I would still cut the old one out by cutting the pipes and I would still cut the pipes on a new core BUT, I would take the old pipes out that goes thru the firewall, enlarge the holes where the pipes go thru the firewall, and run the heater hose thru the holes and connect them to the cut off pipes on the new heater core,that way its simpe,easy,and only one connection, wouldnt need the swivel ends on the core at all,would be real easy to connect, then if one ever had to change the core out agan, slide the hose off the pipes,slide in a new core,connect the 2 hoses, done deal,what I did works, but one has to use the core with the swivel ends in order to slide the short piece of hose over the pipes,took a hair longer to do and of course 2 hose clamps on each pipe, the other way,only one connection on each pipe, and would be absolutly no problem to manuver 2 rubber heater hoses onto the pipes. Actually I would of made the change I described BUT I didnt think of doin it till after I had the dash back in, mmmm, hindsight is 20-20, so they say, could also be age.
As for the other clamp that holds the 2 pipes down thats against the fire wall, that one you cant get a screw driver on, so just take a Dremil tool with a little cutter or blade or grindstone on it,lots of room to just reach in and grind the head of the small screw off,dont need the clamp back there at all anyway when one has hoses pass thru the firewall.
Now I know some of you guys and dolls will really cringe at the thought of what I did and what I will do next time, BUT I will modify just about anything that will make things easier,and in this case a couple of simple cuts propably saved a hour or so and more scraped fingers,dropped bolts and nuts, and a few choice words on top of it,not to mention cutting into my recreation time.