99' guage install
 02-26-2009, 12:12 PM
#1
Registered User
Thread Starter

Join Date: Nov 2008
Location: toronto
Posts: 23
Likes: 0
Received 0 Likes
on
0 Posts
99' guage install
well time has come to shell out some coin on some guages.
they were ordered throu rockspyder 4x4 hear in toronto and from glow shift.
first things first. everyone wants to know what they cost right.
well in canadian funds $446.35----- no that thats over, lets get on with the install.
1 guage pilar
1 fuel pressure guage
1 boost guage
1 exhaust temp guage
hear are some pics.
if anyone has installed a set like this or any other, any advise will be appricated
thanks.
 02-26-2009, 02:55 PM
#2
Registered User
Join Date: Aug 2006
Location: outside of H-town, Tx, thankfully
Posts: 286
Likes: 0
Received 0 Likes
on
0 Posts
Is the fp gauge mech. or elect.,,,,,, if it's mech. and has the plastic tubing with it and a isolator?
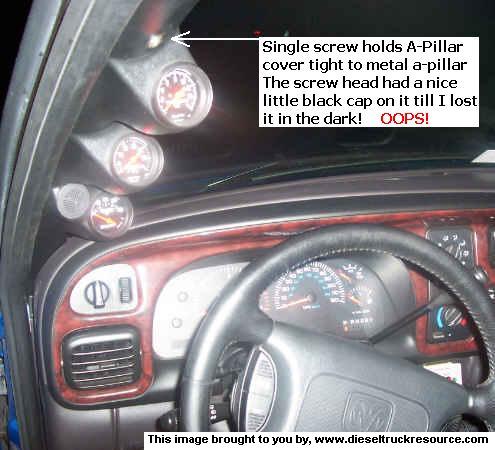
Go get you another plain pillar at the junk yard unless you don't plan on every using your original again because the one I have has to be mounted to the orignal with screws and then drilled for the lines going to the engine compartment, also if you have the tweeter speaker, mine wouldn't screw down to the orignal becasue of the tweeter, thus the "junk yard pillar post without tweeter hole".
Answer these and we can talk some more,,, to much typing
02-26-2009, 03:45 PM
#3
Registered User
Join Date: Jun 2006
Location: Thamesford, Ontario Canada
Posts: 1,288
Likes: 0
Received 0 Likes
on
0 Posts
I actually took the OEM A Pillar cover off before installing my new Triple Pod. Mounting I ended up drilling a hole and running a screw into one of the OEM holes in the A-Pillar. Might not look as good with the screw, but I have a lot more room to work with for my hoses and wires!
Installation is pretty simple, just take your time and read instructions if you have to. Being as your truck is stock, are you going to read fuel pressure at the VP or on top of the Fuel Filter Canister?
Installation is pretty simple, just take your time and read instructions if you have to. Being as your truck is stock, are you going to read fuel pressure at the VP or on top of the Fuel Filter Canister?
 02-26-2009, 05:20 PM
#7
Registered User

I just drilled through, cleaning along the way. Then after completing the hole I used a small magnet to reach into the hole and get as much as possible. The rest just blows through with no problems on the couple I've done.
Trending Topics
02-26-2009, 06:00 PM
#8
Administrator
Join Date: Aug 2001
Location: Disputanta, Virginia
Posts: 3,529
Likes: 0
Received 2 Likes
on
2 Posts
I actually took the OEM A Pillar cover off before installing my new Triple Pod. Mounting I ended up drilling a hole and running a screw into one of the OEM holes in the A-Pillar. Might not look as good with the screw, but I have a lot more room to work with for my hoses and wires!

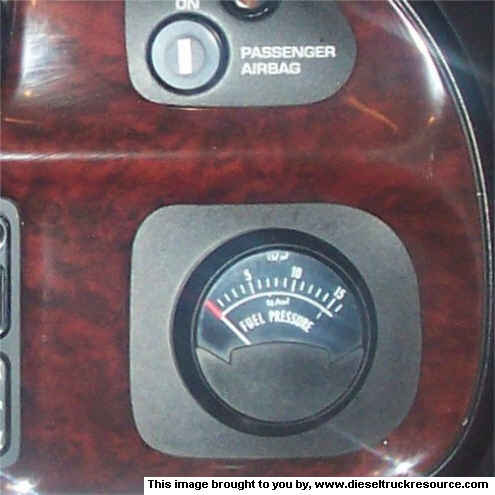
I put the fuel pressure gauge in the dash where the little cubby hole was.
And here is a pic of the fuel pressure connections. The test ports on the 99 filter housing make it real easy. I have the FP gauge in the dash reading PSI between VP-44 and filter plus the mechanical gauge under the hood shows the PSI between the filter and the lift pump.
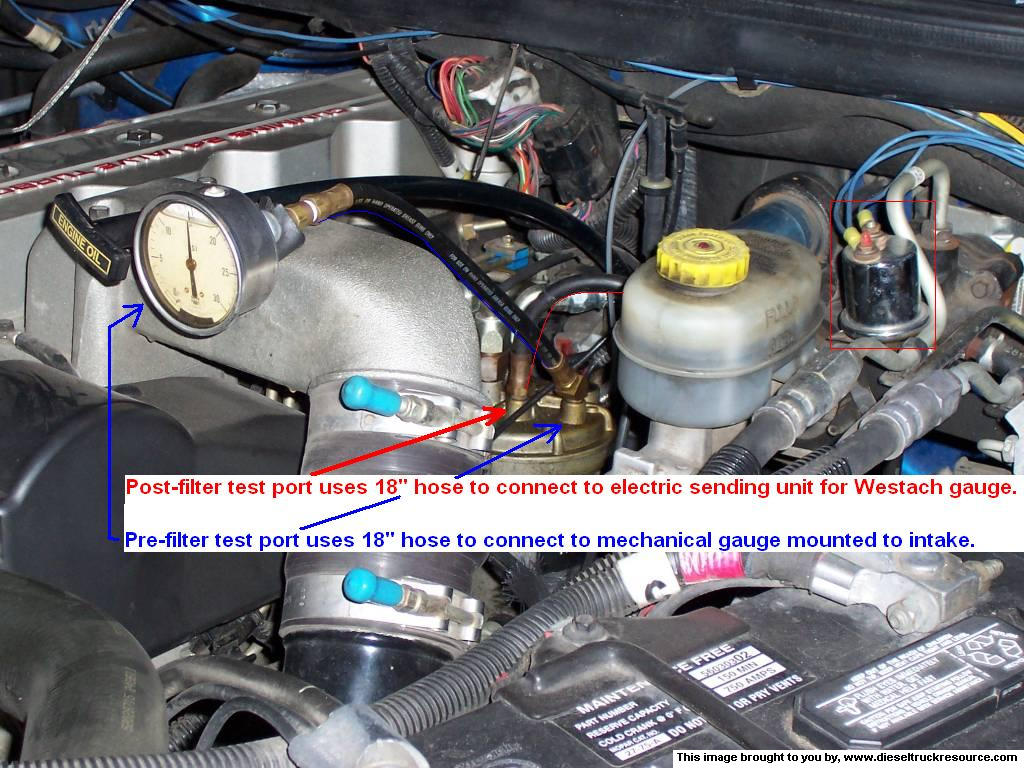
Click on pic for larger view.
Hope this may help. D:
02-26-2009, 06:01 PM
#9
Registered User
Join Date: Dec 2008
Location: Lynden WA
Posts: 190
Likes: 0
Received 0 Likes
on
0 Posts
i just did the glow shift gauges on my 95. only problem i had was mounting the gauge in the pod, it's a real tight fit for the keeper. I ended up sawing the keeper in half between the two bolt holes and slotting the holes so they fit without feeling like it was gonna break the pod.
Only issue i have with them is night driving, cant dim them down, i just turn them on red. They look really good at night tho.
BTW.... i did the screw into the pillar arm too.
I ended up sawing the keeper in half between the two bolt holes and slotting the holes so they fit without feeling like it was gonna break the pod.Only issue i have with them is night driving, cant dim them down, i just turn them on red. They look really good at night tho.
BTW.... i did the screw into the pillar arm too.
02-26-2009, 06:21 PM
#10
Banned

Join Date: Nov 2006
Posts: 1,031
Likes: 0
Received 0 Likes
on
0 Posts
If you have the speaker in the a pillar, the stock trim has to be cut back so the molding around the speaker allows the stock trim to fit the gauge pod. I'd get one from the JY without the speaker & drill 1" holes to run hoses & wires without messing up my stock trim if doing it over. Pick up some extra plastic nails from the parts store to hold the stock trim tighter to the pod. I ran mechanical direct to the gauge without the isolator. Yep, diesel in the cab. Good reason to do maintenance & make sure the thing doesn't leak.
02-26-2009, 06:33 PM
#11
Registered User
Join Date: Aug 2005
Location: Airdrie, Alberta
Posts: 7,780
Likes: 0
Received 0 Likes
on
0 Posts
02-26-2009, 10:17 PM
#12
Registered User

Join Date: Jul 2005
Location: Colorado Springs
Posts: 1,008
Likes: 0
Received 0 Likes
on
0 Posts
i just did the glow shift gauges on my 95. only problem i had was mounting the gauge in the pod, it's a real tight fit for the keeper. I ended up sawing the keeper in half between the two bolt holes and slotting the holes so they fit without feeling like it was gonna break the pod.
Only issue i have with them is night driving, cant dim them down, i just turn them on red. They look really good at night tho.
BTW.... i did the screw into the pillar arm too.
I ended up sawing the keeper in half between the two bolt holes and slotting the holes so they fit without feeling like it was gonna break the pod.Only issue i have with them is night driving, cant dim them down, i just turn them on red. They look really good at night tho.
BTW.... i did the screw into the pillar arm too.
Are you talking about the "keeper" being the bracket you install on the back side of the gauge so the gauge can't be pulled back out of the a pillar pod? If so I left mine out so I could replace a bulb if and when it burns out without having to remove the entire pillar. I also drilled and ran all my wires behind the original pillar and then have 3 or 4 push in x-mas tree plugs that connect the new pillar to the old one. Everything painted to match.
I also tapped into my ash tray light for dimable lights. No issues with 4 gauges and 3 years.
 02-27-2009, 12:33 AM
#13
Registered User
Thread Starter
Join Date: Nov 2008
Location: toronto
Posts: 23
Likes: 0
Received 0 Likes
on
0 Posts
thanks for all the pics and advise. i will take pics of everything as i go along i just have to make time to get er done now.
the fuel psi guage is electric
im going to read fuel psi and the fuel filter canister
the fuel psi guage is electric
im going to read fuel psi and the fuel filter canister
02-27-2009, 06:55 AM
#14
Registered User
Join Date: Dec 2008
Location: Lynden WA
Posts: 190
Likes: 0
Received 0 Likes
on
0 Posts
Are you talking about the "keeper" being the bracket you install on the back side of the gauge so the gauge can't be pulled back out of the a pillar pod? If so I left mine out so I could replace a bulb if and when it burns out without having to remove the entire pillar. I also drilled and ran all my wires behind the original pillar and then have 3 or 4 push in x-mas tree plugs that connect the new pillar to the old one. Everything painted to match.
I also tapped into my ash tray light for dimable lights. No issues with 4 gauges and 3 years.
I also tapped into my ash tray light for dimable lights. No issues with 4 gauges and 3 years.
Instructions tell ya to hook one wire to batt (constant) and one wire to ignition side. not sure they would work with a reduced voltage.
02-27-2009, 07:53 AM
#15
Registered User
Thread Starter
Join Date: Nov 2008
Location: toronto
Posts: 23
Likes: 0
Received 0 Likes
on
0 Posts
well its pooring rain outside today so i decided to get done what i can.
hear are some pics of the guages going into the pod and then the wiring being hooked to the back and finaly went outside to see if it would fit over the old piller, it dident so i removed it and put the speaker into the guage pod and now its a waiting game for me and the weather.
hear are the pics in order i hope.