24v Injector Install Tips
 03-25-2009, 12:25 PM
#1
Registered User
Thread Starter
Join Date: Jul 2008
Location: Concord, NC
Posts: 148
Likes: 0
Received 0 Likes
on
0 Posts
24v Injector Install Tips
This is for people like me who have never installed injectors before and want to install them theirselves. Hopefully this helps. The guide I used was this:
http://cumminsdatabase.com/pdf_files...structions.pdf
They will take you through the steps but I figured I would post up a few pix of my own.
*******THE WRITING APPLIES TO THE PICTURE ABOVE IT*******
^^^^^^^^^^^^^^^^^^^^^^^^^^^^
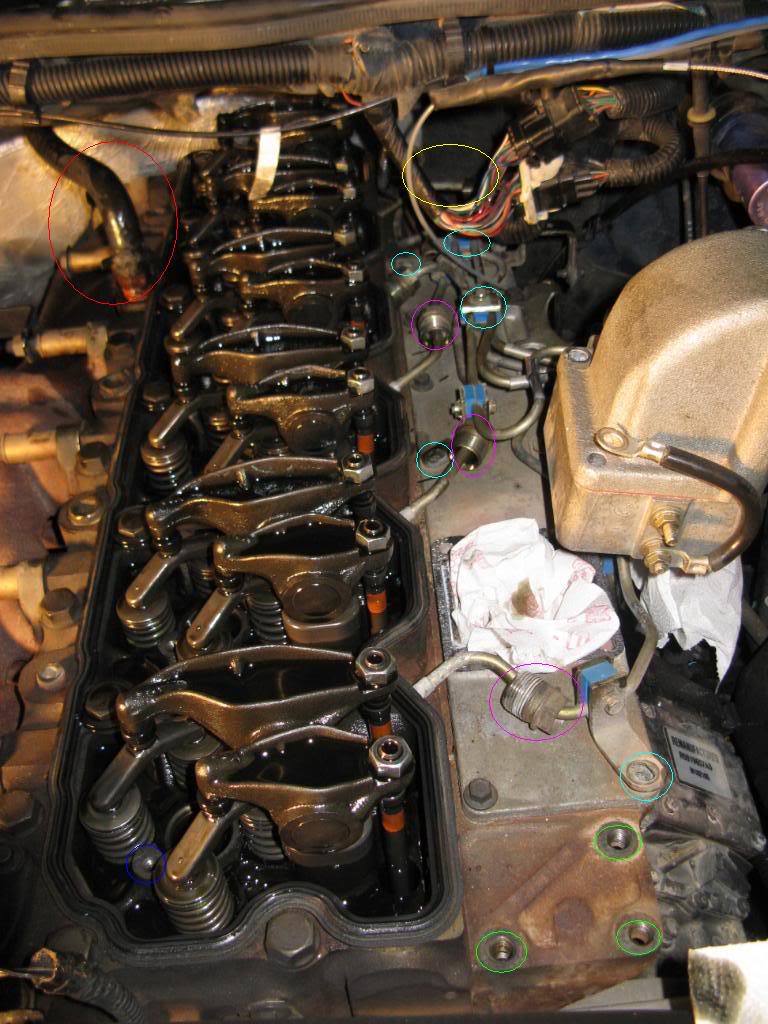
The hose circled in RED is the heater hose that the guide mentions you have to fold down. Pinch it down as far as possible and you have to move the valve cover laterally toward the passenger side, then pull it straight out. I started trying to pull it straight out at first and this doesnt work.
The YELLOW circle shows the location of the cylinder head lifting bracket. This has to be removed in order to be able to move the fuel line back to pry out on the crossover tube. Just two bolts and a PITA and its out.
Circled in GREEN are the throttle assembly bolts. PURPLE are the injector line nuts. LIGHT BLUE are bolts that need to be loosened or taken out to help move the fuel lines in order to pry out on the crossover tubes. The DARK BLUE circle at the bottom left is where the injector cap retaining bolt goes.
______________________________________
^^^^^^^^^^^^^^^^^^^^^^^^^^
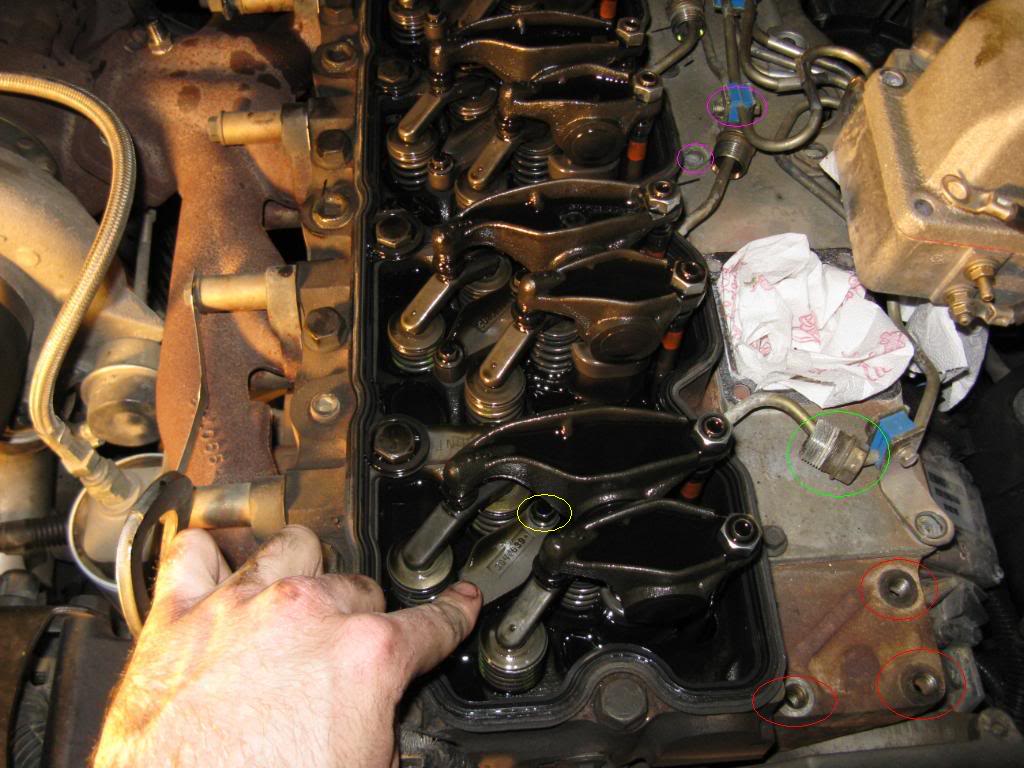
My finger is pointing to the injector cap, and under my finger is the cap bolt that needs to be removed. The other bolt can stay inplace.
______________________________________
^^^^^^^^^^^^^^^^^^^^^^^^^^
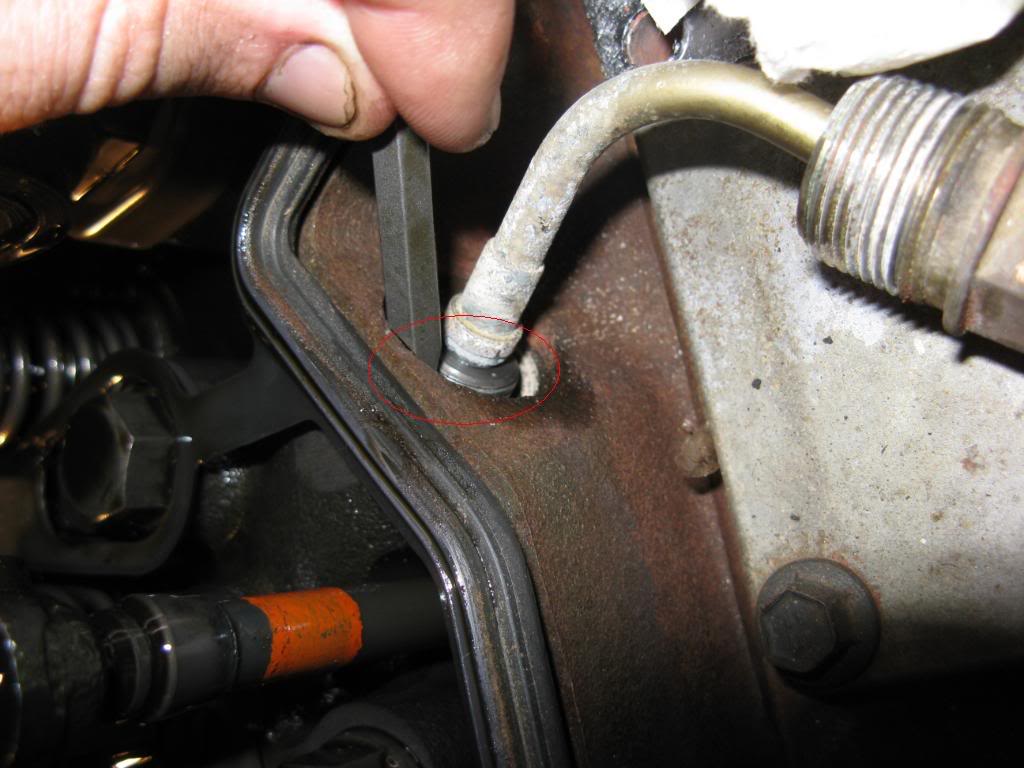
The hardest part I had was working with the rear cylinder crossover tube. I used a short flat head drill bit to pry on it. You can see on the picture about where to pry. These tubes only need to move out about 1/4" or so and the injector can be pulled out. Use an intake horn bolt and thread it in the top of the injector to have a source to pry on the get it out.
______________________________________
^^^^^^^^^^^^^^^^^^^^^^^^^^
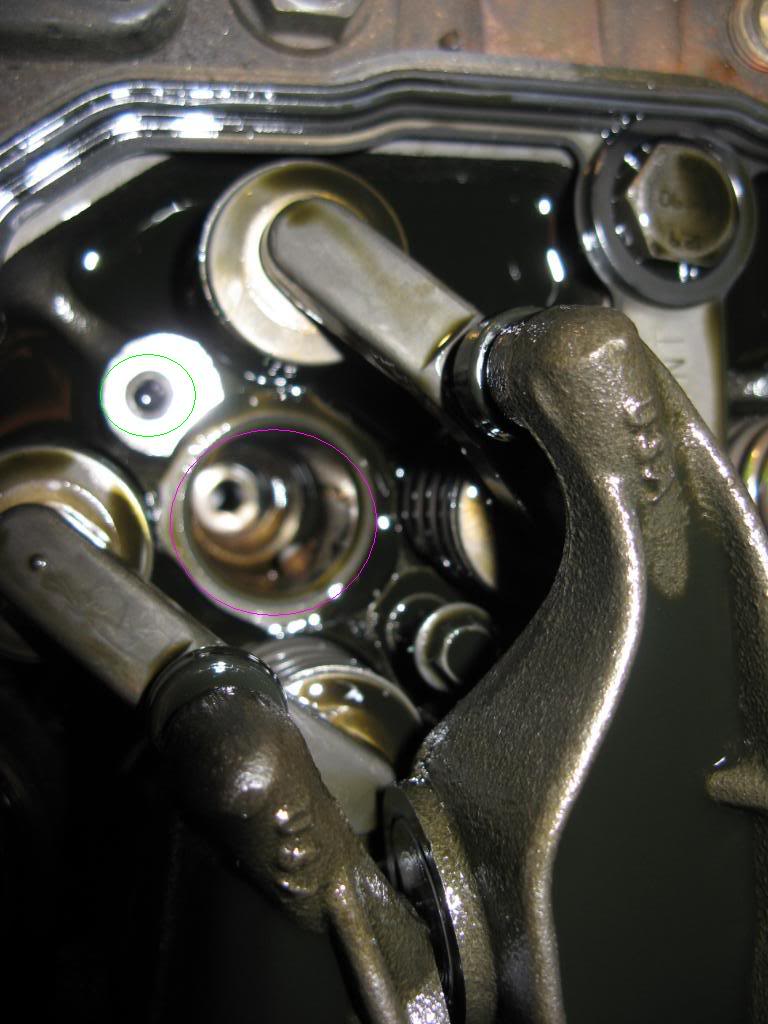
Here's the injector hole.
For the whole process check out one of the guides that I listed at the top. I was just pointing out some of the key parts of the install.
Hope this helps!!!
http://cumminsdatabase.com/pdf_files...structions.pdf
They will take you through the steps but I figured I would post up a few pix of my own.
*******THE WRITING APPLIES TO THE PICTURE ABOVE IT*******
^^^^^^^^^^^^^^^^^^^^^^^^^^^^
The hose circled in RED is the heater hose that the guide mentions you have to fold down. Pinch it down as far as possible and you have to move the valve cover laterally toward the passenger side, then pull it straight out. I started trying to pull it straight out at first and this doesnt work.
The YELLOW circle shows the location of the cylinder head lifting bracket. This has to be removed in order to be able to move the fuel line back to pry out on the crossover tube. Just two bolts and a PITA and its out.
Circled in GREEN are the throttle assembly bolts. PURPLE are the injector line nuts. LIGHT BLUE are bolts that need to be loosened or taken out to help move the fuel lines in order to pry out on the crossover tubes. The DARK BLUE circle at the bottom left is where the injector cap retaining bolt goes.
______________________________________
^^^^^^^^^^^^^^^^^^^^^^^^^^
My finger is pointing to the injector cap, and under my finger is the cap bolt that needs to be removed. The other bolt can stay inplace.
______________________________________
^^^^^^^^^^^^^^^^^^^^^^^^^^
The hardest part I had was working with the rear cylinder crossover tube. I used a short flat head drill bit to pry on it. You can see on the picture about where to pry. These tubes only need to move out about 1/4" or so and the injector can be pulled out. Use an intake horn bolt and thread it in the top of the injector to have a source to pry on the get it out.
______________________________________
^^^^^^^^^^^^^^^^^^^^^^^^^^
Here's the injector hole.
For the whole process check out one of the guides that I listed at the top. I was just pointing out some of the key parts of the install.
Hope this helps!!!
 03-26-2009, 12:24 PM
#2
Registered User
Join Date: Jan 2007
Location: Mason, Ohio
Posts: 35
Likes: 0
Received 0 Likes
on
0 Posts
To pull the injectors out of there ports you can screw the bolts that hold the valve cover right into the top of the injectors. One of those nice little tricks that save you a headache.
03-26-2009, 02:50 PM
#3
Registered User
Thread Starter
Join Date: Jul 2008
Location: Concord, NC
Posts: 148
Likes: 0
Received 0 Likes
on
0 Posts
03-27-2009, 08:28 AM
#4
Registered User
Join Date: Mar 2009
Location: kingman, az
Posts: 56
Likes: 0
Received 0 Likes
on
0 Posts
thanks for the info i was just looking at a new set of injectors. how hard is it to just change the injector nozzle or would it be better to just get the hole injector?
03-30-2009, 08:41 AM
#5
Registered User
Thread Starter
Join Date: Jul 2008
Location: Concord, NC
Posts: 148
Likes: 0
Received 0 Likes
on
0 Posts
ive never done nozzles. i think they just screw on, then you should take them to a shop and have them pop tested. i went ahead and bought a good full injector b/c ive heard mixed opinions about the edge jammer nozzles.
03-31-2009, 05:06 AM
#6
Chapter President
Join Date: Jun 2007
Location: Elk River, MN
Posts: 1,124
Likes: 0
Received 0 Likes
on
0 Posts
I run the Jammer nozzles. Took about 2 hours for the complete job. Great improvement over stock. Idle was a lot smoother. For the money I would do it again in a heartbeat.
07-02-2009, 05:33 PM
#7
Registered User
This was a great help thx stevewes2004. i installed mine in 3hrs ... would of been 2hrs but 1 hr i ran to buy an adaptor for my torque wrench which i didnt need. Only info i would add is injector makes a "pop" sound went its pushed down in place, same with injector sleeve.
Trending Topics
02-11-2011, 08:15 PM
#9
Registered User

Join Date: Sep 2003
Location: Aiken SC
Posts: 247
Likes: 0
Received 0 Likes
on
0 Posts
The new link to the instructions:
http://dieseldatabase.com/dodge-24v-...r-replacement/
http://dieseldatabase.com/dodge-24v-...r-replacement/

Thread
Thread Starter
Forum
Replies
Last Post
king5335
Performance and Accessories 2nd gen only
26
01-17-2010 07:57 PM
Diesel-Dan
3rd Gen Engine and Drivetrain -> 2003-2007
17
08-04-2006 09:51 AM
moparguy
Performance and Accessories 2nd gen only
2
04-05-2006 08:09 PM
CTD_Neil
Performance and Accessories 2nd gen only
2
01-05-2005 02:52 PM
Diesel-Dan
12 Valve Engine and Drivetrain
1
11-21-2003 09:16 PM