2WD Upper/Lower Balljoint install with wheel bearing/brake service (Pics)
 10-11-2011, 09:10 PM
#16
Registered User
Thread Starter
Join Date: Nov 2007
Location: Maine
Posts: 1,816
Likes: 0
Received 0 Likes
on
0 Posts

Brand new tires, and got an alignment. I think I've put 6,000+ on it since then with no wearing at all.
 02-24-2013, 09:52 AM
#18
Registered User
Join Date: Oct 2011
Posts: 14
Likes: 0
Received 0 Likes
on
0 Posts
hey guys i found a way around buying the upper ball joint socket. i couldn't find it at any parts dealers near me, tried getting everything on the old one to get it out until i looked over a realized that SQUARE TUBING fit over it perfectly. we had some thick wall square tubing in the shop. i cut it down to about 4 inches long and put a pipe wrench on it, got it out! used the same method to put the new one in. the tubing i used did not cause any damage to the ball joint. probley would have been alot easier to have the socket, but redneck ingenuity and hard work worked too.
02-24-2013, 10:28 AM
#19
Registered User

hey guys i found a way around buying the upper ball joint socket. i couldn't find it at any parts dealers near me, tried getting everything on the old one to get it out until i looked over a realized that SQUARE TUBING fit over it perfectly. we had some thick wall square tubing in the shop. i cut it down to about 4 inches long and put a pipe wrench on it, got it out! used the same method to put the new one in. the tubing i used did not cause any damage to the ball joint. probley would have been alot easier to have the socket, but redneck ingenuity and hard work worked too.
It takes a little longer but the little propane jobs that use the one-pound Coleman tanks work too.
02-24-2013, 05:18 PM
#20
Registered User
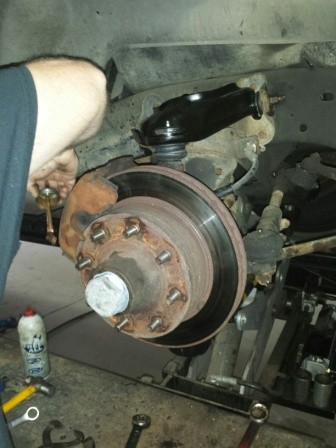
Did you know that you can use D-350 pads on the D-250?
This gives you some extra stopping power because the D-350 outboard pads
are 3/8" wider than the D-250 pad.
D-350 pad on top, D-250 pad on bottom

This gives you some extra stopping power because the D-350 outboard pads
are 3/8" wider than the D-250 pad.
D-350 pad on top, D-250 pad on bottom
08-31-2014, 01:48 PM
#21
Registered User
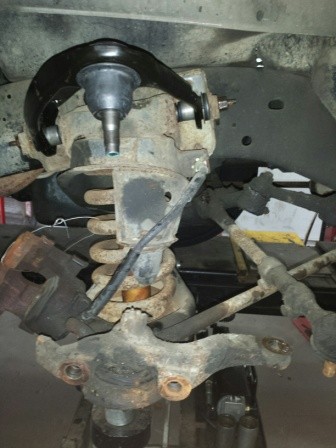
Tips on removing the ball joints from the knuckle assembly? Pickle fork and a 16oz hammer at the moment aren't working. I only have MAP gas so I don't have an adequate sized hot wrench...
Any tips on removing the upper control arm?
Any tips on removing the upper control arm?
08-31-2014, 02:58 PM
#22
Registered User
I've had luck with an 8lbs sledgehammer breaking the taper of tie rods, etc and the upper ball joint in the spindle. Leave the nut on the stud a few threads so you don't have to catch the spindle assembly. Keep tension on the coil spring with a floor jack under the lower control arm holding the weight of the front end. You'll need sufficient ground clearance to accomplish this method though.
Removing the upper control arm should be simple by just removing the hardware and pulling it out.
Removing the upper control arm should be simple by just removing the hardware and pulling it out.
08-31-2014, 03:03 PM
#23
Registered User
I've had luck with an 8lbs sledgehammer breaking the taper of the upper ball joint in the spindle. Leave the nut on the stud a few threads so you don't have to catch the spindle assembly. Keep tension on the coil spring with a floor jack under the lower control arm holding the weight of the front end. You'll need sufficient ground clearance to accomplish this method though.
Removing the upper control arm should be simple by just removing the hardware and pulling it out.
08-31-2014, 06:22 PM
#24

I did the job last month. Replaced upper and lower ball joints, upper and lower control arm bushings, new springs, and new idler arm also.
I do have the proper upper ball joint socket, but my whimpy Campbell Hausfeld impact could not loosen it with the 1/2 in to 3/4 in adapter. Took the UCA's to a heavy diesel shop near by. Their 3/4 impact did the job quickly. Best part was, they did not charge me. My whimpy impact was able to drive in the new ball joints though.
I used my 20 ton arbor press to take care of all the bushings and the lower lower ball joints.
I used 3 ton jack stands to hold the front end and a 3 ton jack under the LCA. The springs did not have much tension on them, so they swapped out very easily.
09-04-2014, 06:59 PM
#25
Registered User
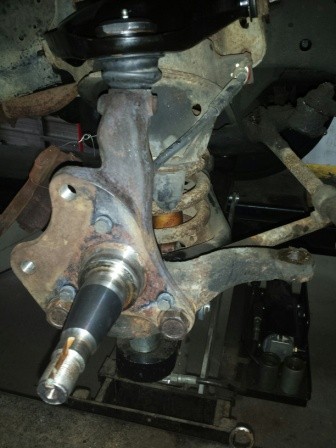
I got it off.
Socket from Napa was $70 and change. Gonna change it out later this evening.
I had to cut the camber bolts. I should show the pic. GO SLOW UNLESS YOU LIKE WIPING OUT SAWZALL BLADES!
I found a trick online to not needing a pickle fork. I did not have my BFH when I tried the pickle fork. However, obtaining 2 BFH's are better and you don't need to return the 2nd hammer you bought as its useful. I loosened the nut until it was flush with the bottom of the stud. Now take your 2 hammers and hit the top of the hub at a slight downward angle where the ball joint stud goes through. The combined hits and front spring tension did it in 1 hit. I put the jack back under the LCA and pumped it up until the tension was off the castle nut.
09-07-2014, 06:09 PM
#26
You can get replacement camber bolts at Auto Zone.
I paid $55 for the socket at O'Reilly. I now have the same socket made by Proto that a friend gave me since he no longer works on the old Dodges
I paid $55 for the socket at O'Reilly. I now have the same socket made by Proto that a friend gave me since he no longer works on the old Dodges
11-08-2014, 10:14 AM
#27
Registered User
Just did this the other day using your instructions. Thanks, for taking the time to post it. At some point the upper ball joint had been welded to the UCA and destroyed the BJ and made the UCA unusable. Bought a new UCA and ball joint from the dealer (ouch). Bought the socket off of eBay $38. All went well and aligned easily.
Edit: the knuckle was also ruined by the loose upper BJ and I replaced it with a used one. Dealer no longer has them.
Edit: the knuckle was also ruined by the loose upper BJ and I replaced it with a used one. Dealer no longer has them.
11-11-2014, 03:17 PM
#28

Instead of beating the things apart- I hate leaving witness marks! I choose to duplicate the factory method. You can get a large grade 8 bolt (say 3/4 in-maybe it was a 1/2), and measure the gap between the bolts. I ground the threaded end to just fit. Didn't take much. Then I used a nut on the other side and created tension, by undoing them. If the bolt kicks due to the angle- tap it back. Whole thing pops apart easy and if you for some reason have to go back.
I can measure if someone needs the info.
Socket, I got a used snap-on for $20. Same socket for all chryslers I do believe.
I can measure if someone needs the info.
Socket, I got a used snap-on for $20. Same socket for all chryslers I do believe.
11-11-2014, 03:44 PM
#29
Registered User
Agreed, no need to unnecessarily beat on anything. There are at least two sizes of the Chrysler specialized BJ sockets. The larger one for the trucks and a smaller one for sedans. I never find a good deal when I need a tool quick.

Thread
Thread Starter
Forum
Replies
Last Post
EdmontonCanada
3rd Gen High Performance and Accessories (5.9L Only)
37
02-04-2016 12:02 PM
bowedup2003
3rd Gen Engine and Drivetrain -> 2007 and up
2
11-04-2009 11:11 PM
GreyTD
3rd Gen Engine and Drivetrain -> 2003-2007
14
12-24-2007 09:13 PM