2WD Upper/Lower Balljoint install with wheel bearing/brake service (Pics)
 03-07-2010, 11:50 PM
#1
Registered User
Thread Starter
Join Date: Nov 2007
Location: Maine
Posts: 1,816
Likes: 0
Received 0 Likes
on
0 Posts
2WD Upper/Lower Balljoint install with wheel bearing/brake service (Pics)
Couldn't find a write up for 2wd balljoints so I thought I'd take a few pictures along the way. Hopefully it will help out a few others trying to save a few bucks. I'm sure there are better ways to do the job, please offer all tips and pointers for others doing the job down the road...
Other than basic hand tools you'll need a balljoint press kit, large wrenches (up to 1 1/8" I believe) a large socket for the wheel bearing nut (1 5/16", but 1 3/8" worked), preferably a torque wrench, a ball joint separator fork, brake cleen, anti-seize (never seeze, preferably nickle based), a bearing packer is REAL nice (~$20), and an impact is real handy. Depending on your kit, you may need a 3/4 Drive impact or breaker/bar or ratchet for the upper balljoint.
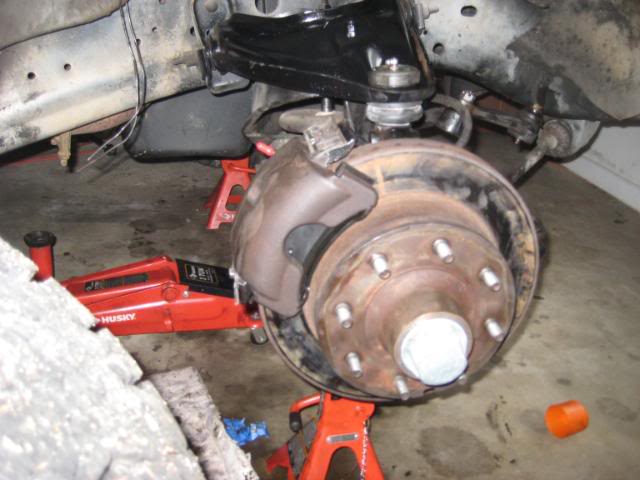
Block you rear wheels and jack your truck up and place it on jack stands. Make sure the jackstands are unloading the lower balljoint. IE, place the jack stands under the lower control arms, so the weight of the truck is still compressing the suspension. If you don't, when you disconnect one of the balljoints, the spring will push the lower control arm all the way down!! I tucked mine just outboard the lower shock mounts.
Please excuse my nautical nomenclature along the way (Richie, I don't want to hear it ...)
...)
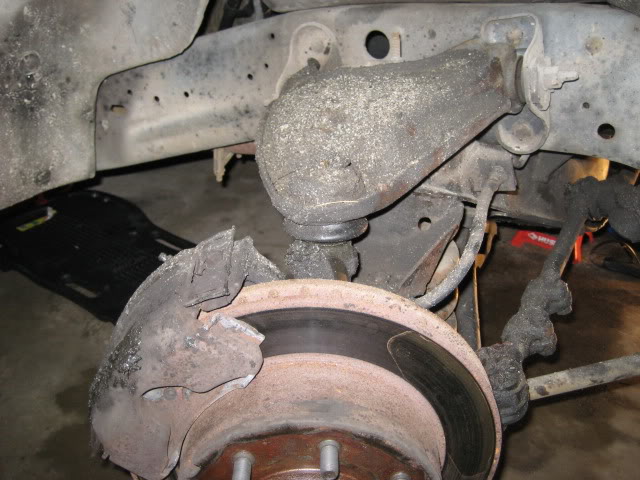
First off, lets pressure wash this greasy grimy front end. A few years of bad balljoints and knowing it led to over greasing to delay the inevitable. BTW, there was over a solid 1/2" of grease on top of the upper control arm .
.
Much better. Now we can dig in with less rags. We'll start by removing the calipers. Remove the 2 bolts on the caliper that hold it to the caliper support via the slides. Some may find it necessary to compress the caliper with a c clamp at this time, but mine were able to wiggle off by pushing in/out while lifting on the bottom part up and sliding the caliper aft. Support the caliper by a wire, not the hose! If you don't compress the caliper piston in with a c clamp, it is necessary to remove the banjo bolt and move the caliper assembly to the work bench where you will do so later with a more archaic approach
Remove the 2 bolts holding the caliper support. They are TIGHT, you may need some mechanical advantage...

Now, remove the dustcap...
Remove the cotter pin, wheel bearing nut keeper, wheel bearing nut, and the tabbed washer...
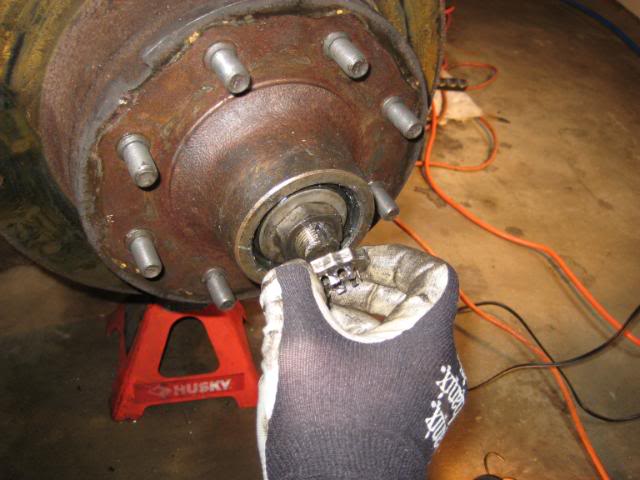
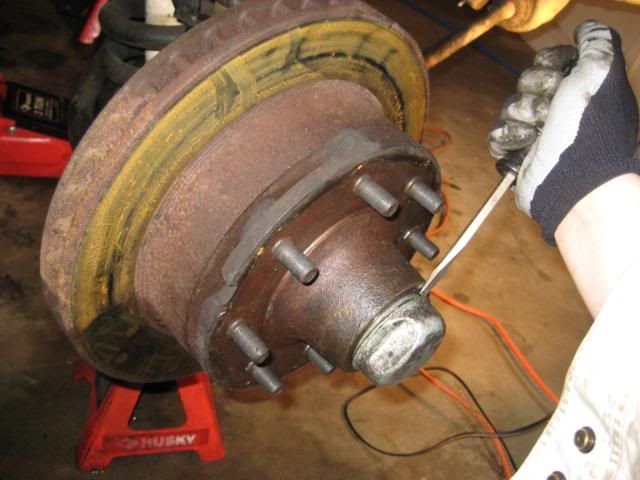
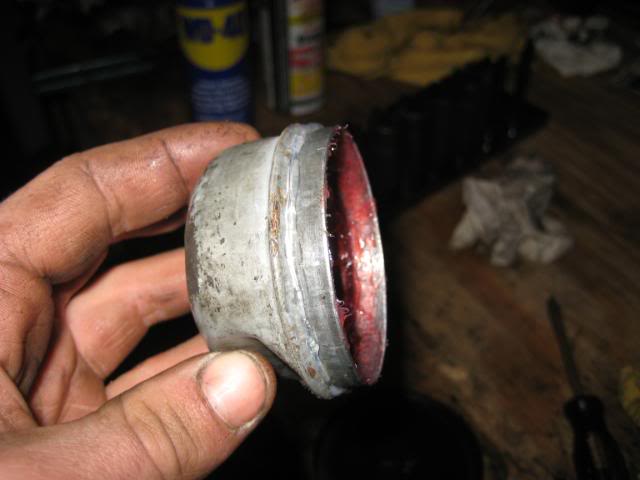
Now cover you hand over the opening to keep the outer wheel bearing from falling out and getting dirt in it. Pull the rotor straight off the spindle and catch the outer wheel bearing at the same time. Place it in a clean place if you are not replacing it. Set the wheel bearing and rotor aside for now...
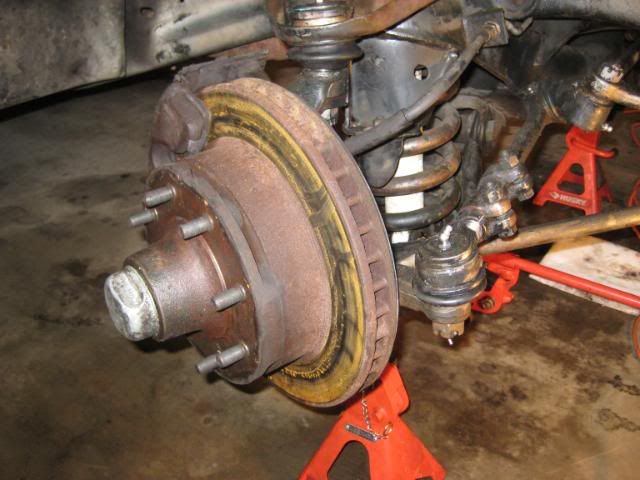
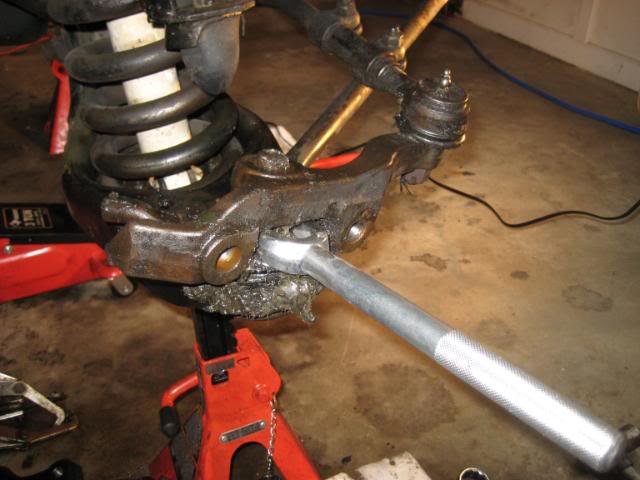
Remove the 3 bolts holding the rotor disc (dust) shield to the spindle, now you have full access to the balljoints unhindered. Remove both cotter pins, and and ALMOST remove the balljoint castle nuts. Leave them threaded on 2 or 3 threads so you won't drop the spindle or steering knuckle in the next step. You may choose now to seperate the spindle from the knuckle via the 2 nuts and bolts, but I don't see it as necissary in retrospect. If you do remove them, an impact is suggested and you'll have to hold the other side with a wrench. They come hard and go on hard the WHOLE WAY...
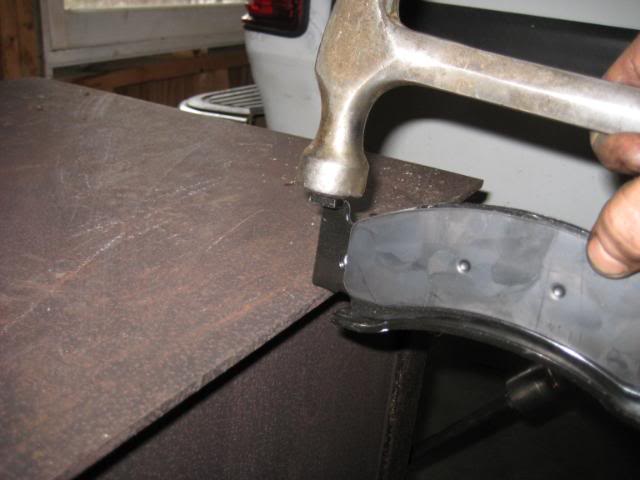
The lower balljoint is larger than most balljoints Napa anticipated. The opening on my ball joint seperator tool (pickle fork) was only 15/16". I needed to grind it so the gap between the fork was about 1 1/8", and deep into the fork as well. With the fork, seperate the upper balljoint from the spindle, and the lower balljoint from the steering knuckle with many well placed blows to the back of the fork handle. Don't get frustrated, it takes many wacks sometims to knock them off. Hold the fork in tight so it isn't bouncing on every hit however...
Other than basic hand tools you'll need a balljoint press kit, large wrenches (up to 1 1/8" I believe) a large socket for the wheel bearing nut (1 5/16", but 1 3/8" worked), preferably a torque wrench, a ball joint separator fork, brake cleen, anti-seize (never seeze, preferably nickle based), a bearing packer is REAL nice (~$20), and an impact is real handy. Depending on your kit, you may need a 3/4 Drive impact or breaker/bar or ratchet for the upper balljoint.
Block you rear wheels and jack your truck up and place it on jack stands. Make sure the jackstands are unloading the lower balljoint. IE, place the jack stands under the lower control arms, so the weight of the truck is still compressing the suspension. If you don't, when you disconnect one of the balljoints, the spring will push the lower control arm all the way down!! I tucked mine just outboard the lower shock mounts.
Please excuse my nautical nomenclature along the way (Richie, I don't want to hear it
...)First off, lets pressure wash this greasy grimy front end. A few years of bad balljoints and knowing it led to over greasing to delay the inevitable. BTW, there was over a solid 1/2" of grease on top of the upper control arm
.Much better. Now we can dig in with less rags. We'll start by removing the calipers. Remove the 2 bolts on the caliper that hold it to the caliper support via the slides. Some may find it necessary to compress the caliper with a c clamp at this time, but mine were able to wiggle off by pushing in/out while lifting on the bottom part up and sliding the caliper aft. Support the caliper by a wire, not the hose! If you don't compress the caliper piston in with a c clamp, it is necessary to remove the banjo bolt and move the caliper assembly to the work bench where you will do so later with a more archaic approach
Remove the 2 bolts holding the caliper support. They are TIGHT, you may need some mechanical advantage...
Now, remove the dustcap...
Remove the cotter pin, wheel bearing nut keeper, wheel bearing nut, and the tabbed washer...
Now cover you hand over the opening to keep the outer wheel bearing from falling out and getting dirt in it. Pull the rotor straight off the spindle and catch the outer wheel bearing at the same time. Place it in a clean place if you are not replacing it. Set the wheel bearing and rotor aside for now...
Remove the 3 bolts holding the rotor disc (dust) shield to the spindle, now you have full access to the balljoints unhindered. Remove both cotter pins, and and ALMOST remove the balljoint castle nuts. Leave them threaded on 2 or 3 threads so you won't drop the spindle or steering knuckle in the next step. You may choose now to seperate the spindle from the knuckle via the 2 nuts and bolts, but I don't see it as necissary in retrospect. If you do remove them, an impact is suggested and you'll have to hold the other side with a wrench. They come hard and go on hard the WHOLE WAY...
The lower balljoint is larger than most balljoints Napa anticipated. The opening on my ball joint seperator tool (pickle fork) was only 15/16". I needed to grind it so the gap between the fork was about 1 1/8", and deep into the fork as well. With the fork, seperate the upper balljoint from the spindle, and the lower balljoint from the steering knuckle with many well placed blows to the back of the fork handle. Don't get frustrated, it takes many wacks sometims to knock them off. Hold the fork in tight so it isn't bouncing on every hit however...
 03-07-2010, 11:52 PM
#2
Registered User
Thread Starter
Join Date: Nov 2007
Location: Maine
Posts: 1,816
Likes: 0
Received 0 Likes
on
0 Posts
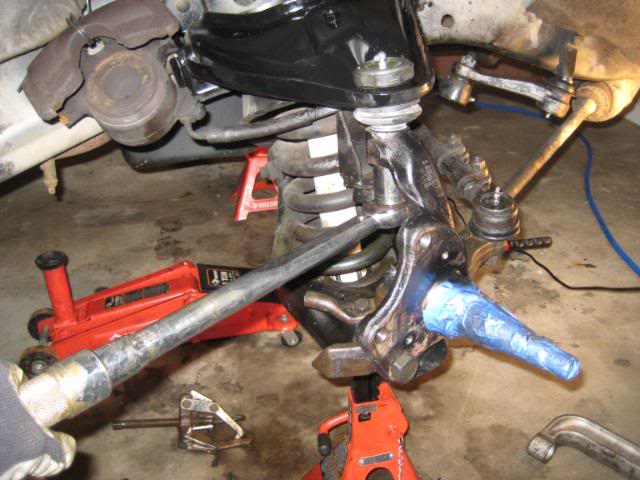
Once they are popped off respectfully, remove the rest of the castle nut and remove the spindle and knuckle.
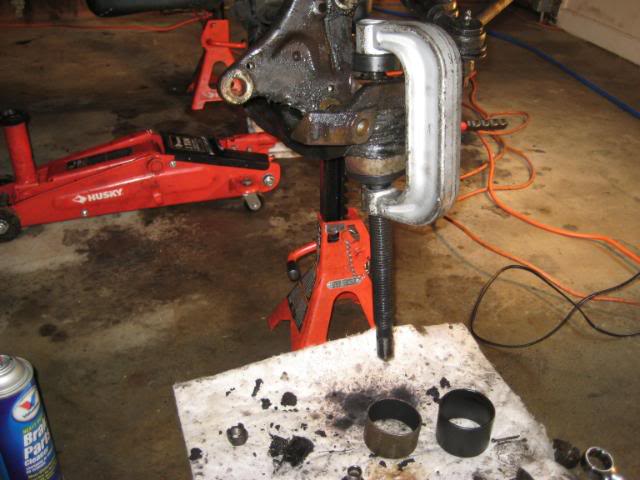
Take you ball joint press you rented, was loaned, or own. Advanced Auto will loan them for "free". You pay for it up front ($170) and they give it back when you return it. However, I had to make a few parts for the lower ball joint out of 3" exhaust pipe. The 2 pieces they gave me to press the joint out was too long for the c clamp, or not long enough cause the balljoint was bottomed out in the clamp and had no free space to be pressed out. I guess you'll have to see what I mean when you do it, but be prepared to get crafty a little!! 3" Exhaust pipe fits PERFECT over the lower mount BTW...
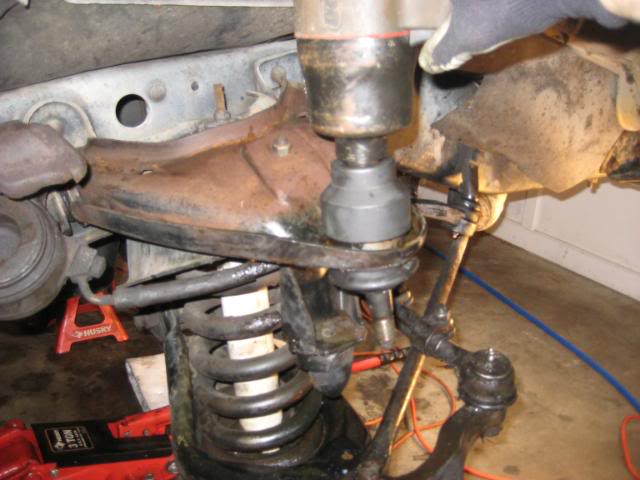
The Upper balljoint is threaded with very shallow, wide angled threads. I accidentally pressed the old one out and the new one in on the driver side. So far no ill effects, but probably not the preferred method! The kit came with the right 4 sided socket with a 3/4" drive. Luckily I had a 3/4" impact. I would not wanted to do this with just a breaker bar or ratchet!...
Now you've removed the bad ball joints, put them back in the same way. Inspect and clean the holes in both control arms. If they are oblong, or cracked you need to replace them!
Make sure the lower joint goes in straight. I had to rotate the c clamp of the press a few times to keep it coming straight. It might press harder on the support side of the clamp as the C is probably bending a slight amount.
Install the top balljoint preferably by threading it!
Inspect the tapered holes of the steering knuckle and spindle. They should not be worn, oblong, or dinged up. These hold the tapered studs of the balljoints with their close tolerance tapers. If they are not good, they can break the studs off eventually! Replace them if they are bad!
There should be specifications on your ball joint installation sheets of torque values. I didn't bother whip out my calipers to measure to see what size they were. They are either 3/4" or 5/8". Either way, 100ft-lb is enough...
Now to get to the bearings and the brakes again....
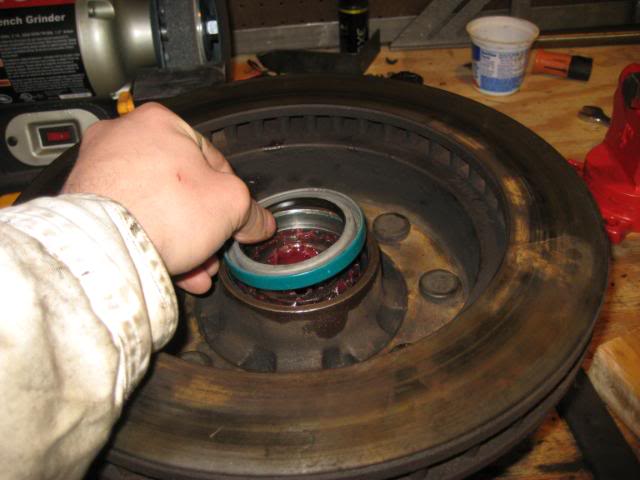
With a small cold chisel or even a punch, go around the circumference of the seal and tap it towards the center, don't let any dirt fall in there especially if you are reusing the bearings...
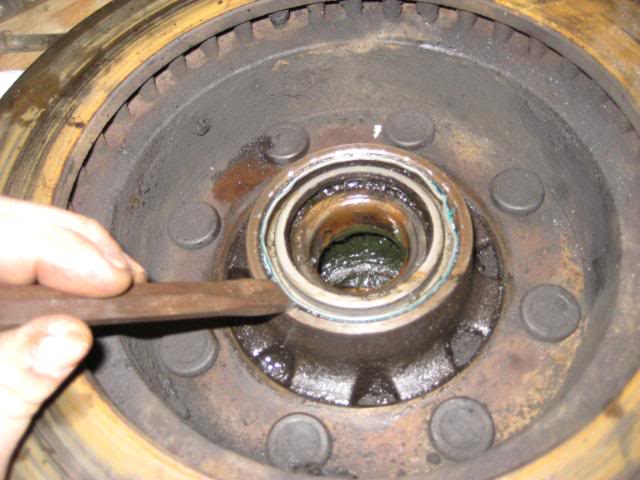
Only now will my $15 seal puller actually pull a seal") . You can probably do this with a screwdriver or carefully with a hammer claw...
. You can probably do this with a screwdriver or carefully with a hammer claw...
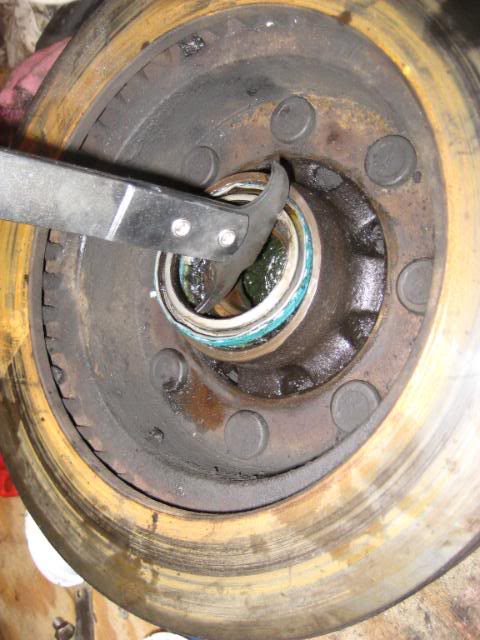
Remove the inner wheel bearing and set it aside in a clean place with the outer one...
Now lets clean up this assembly and check to see if we want our rotor still. Mine was stamped the tolerances were 1.185" thick. Mine was over 1.2" with no flaws on the smooth even surface. I was feeling no pulsation in the brakes before leading me to believe there was no warping, so I did not turn/replace the rotors.
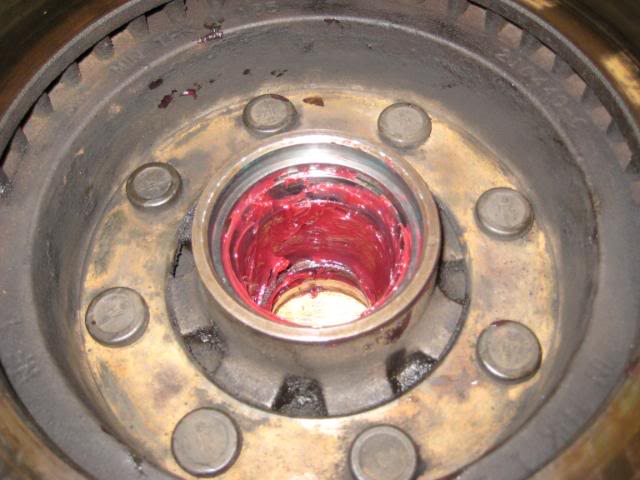
After you cleaned up the outside and cleaned out all the old grease, fill it up with new NGLI EP 2 grease. I just used the Mopar recommended stuff from Valvoline that Napa carried. 1 tub should be enough, but I bought 2. They were only $3.50 each. You don't want it packed full, I just like to fill that deeper groove in the cavity untill it's level with the rest of it, then add a good 1/4" or so everywhere else in there. Your bare hand is the best tool since a brush could leave bristles...
Take you ball joint press you rented, was loaned, or own. Advanced Auto will loan them for "free". You pay for it up front ($170) and they give it back when you return it. However, I had to make a few parts for the lower ball joint out of 3" exhaust pipe. The 2 pieces they gave me to press the joint out was too long for the c clamp, or not long enough cause the balljoint was bottomed out in the clamp and had no free space to be pressed out. I guess you'll have to see what I mean when you do it, but be prepared to get crafty a little!! 3" Exhaust pipe fits PERFECT over the lower mount BTW...
The Upper balljoint is threaded with very shallow, wide angled threads. I accidentally pressed the old one out and the new one in on the driver side
. So far no ill effects, but probably not the preferred method! The kit came with the right 4 sided socket with a 3/4" drive. Luckily I had a 3/4" impact. I would not wanted to do this with just a breaker bar or ratchet!...Now you've removed the bad ball joints, put them back in the same way. Inspect and clean the holes in both control arms. If they are oblong, or cracked you need to replace them!
Make sure the lower joint goes in straight. I had to rotate the c clamp of the press a few times to keep it coming straight. It might press harder on the support side of the clamp as the C is probably bending a slight amount.
Install the top balljoint preferably by threading it!
Inspect the tapered holes of the steering knuckle and spindle. They should not be worn, oblong, or dinged up. These hold the tapered studs of the balljoints with their close tolerance tapers. If they are not good, they can break the studs off eventually! Replace them if they are bad!
There should be specifications on your ball joint installation sheets of torque values. I didn't bother whip out my calipers to measure to see what size they were. They are either 3/4" or 5/8". Either way, 100ft-lb is enough...
Now to get to the bearings and the brakes again....
With a small cold chisel or even a punch, go around the circumference of the seal and tap it towards the center, don't let any dirt fall in there especially if you are reusing the bearings...
Only now will my $15 seal puller actually pull a seal
. You can probably do this with a screwdriver or carefully with a hammer claw...Remove the inner wheel bearing and set it aside in a clean place with the outer one...
Now lets clean up this assembly and check to see if we want our rotor still. Mine was stamped the tolerances were 1.185" thick. Mine was over 1.2" with no flaws on the smooth even surface. I was feeling no pulsation in the brakes before leading me to believe there was no warping, so I did not turn/replace the rotors.
After you cleaned up the outside and cleaned out all the old grease, fill it up with new NGLI EP 2 grease. I just used the Mopar recommended stuff from Valvoline that Napa carried. 1 tub should be enough, but I bought 2. They were only $3.50 each. You don't want it packed full, I just like to fill that deeper groove in the cavity untill it's level with the rest of it, then add a good 1/4" or so everywhere else in there. Your bare hand is the best tool since a brush could leave bristles...
03-07-2010, 11:53 PM
#3
Registered User
Thread Starter
Join Date: Nov 2007
Location: Maine
Posts: 1,816
Likes: 0
Received 0 Likes
on
0 Posts
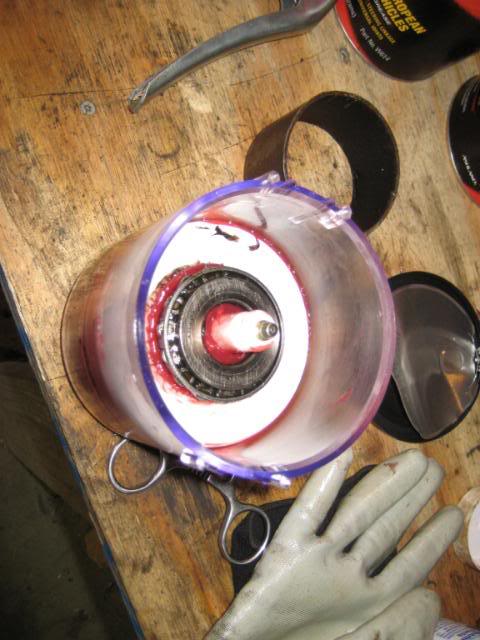
Now we'll repack the bearings. Don't bother cleaning the bearings first in kerosene or anything first. It can just introduce foreign objects inside the bearing easier. You want to push the old grease out with new grease. I did the last trucks bearing by hand. It's messy, takes awhile to feel like you did well, and it's ackward. I bought the Lesile bearing packer from Advanced Auto (Sears carries them too). There are other types, but my mechanic cousin suggested this one. Fill the bottom and insert the o-ringed white peice into the tub. Set the small diameter of the bearing in the middle and push down on the top with the handle. Rotate back and forth, you'll REALLY have to push if it's 30*F in the shop like it was when I did it! You'll see the old grease displace out the top. Keep pushing untill lots of new grease has oozed through and no more old grease is between the rollers...
Place the inner wheel bearing inside the clean, greased rotor/bearing assembly small diameter in first. Don't forget to do this before installing the wheel seal, or you'll be paying $16 for another one. Ask me how I know .
.
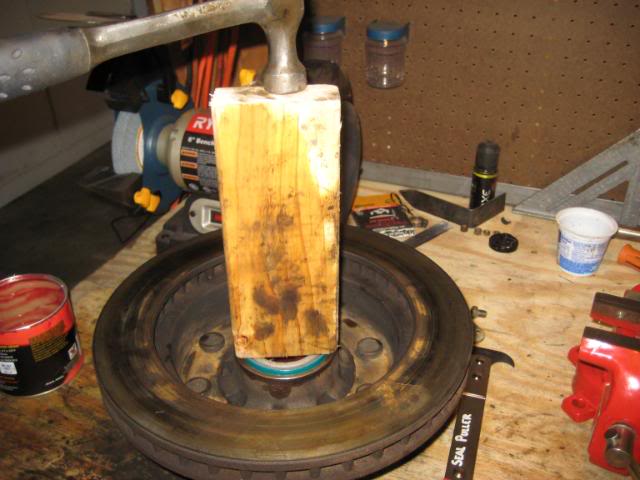
Place the wheel seal facing like so, with the rubber lip pointing in...
Drive the seal in with a block of wood and hammer. Make sure there is no sawdust or dirt that will fall off into the bearing while you knock it in. Tap slowly to make sure you drive the seal in straight. Drive it until its flush with the surface. IF you have a bad groove in your spindle even with a speedy sleeve, DO NOT drive it home yet! Reference another article in the sticky about this...
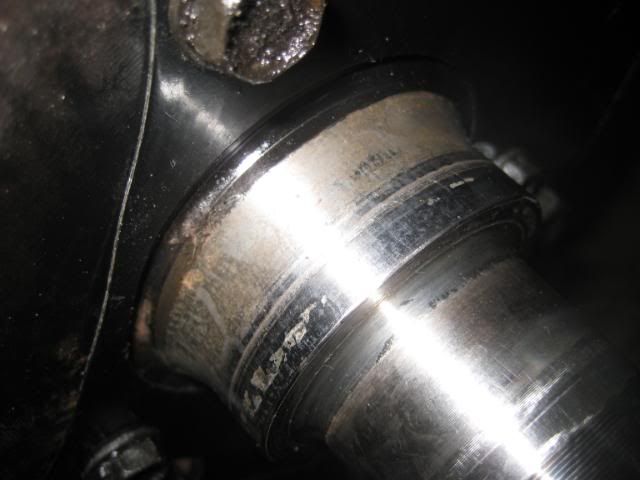
Inspect where your seal rides on your spindle. Mine is not as deep as it looks in this picture, it is mostly a superficial marking than a groove. I could barely detect it with my fingers. I'm told if your fingernail can get hung up on it, you should install a speedy sleeve. You still use the same wheel seal if you put a speedi sleeve on...
Grease the spindle all around. Make sure there is grease where the seal will be riding. Apply some grease on the installed seal as well. Reinstall the dust sheild and your cleaned, never-seized caliper support. Stage your rotor, freshly packed outer bearing, the special tabbed washer, and your wheel bearing nut by the truck. Have it all clean, and in easy reach. Now is a good time to clean the rotor with brake clean and wipe it with clean rags. Try not to get greasy prints on it any more...
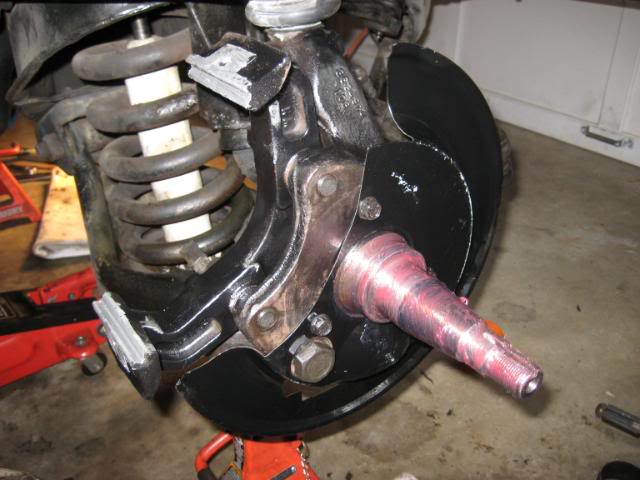
Carefully slip the rotor back onto the spindle and keep it centered as you push it gently home. You don't want to over stretch/ruin your new wheel seal. While holding it centered, push the fresh packed outer wheel bearing (small diameter inboard) into the rotor and on the spindle. Now it is holding everything concentric. Slip the tabbed washer on making sure the tab is in the keyway on the spindle, and thread on the nut. You need to set the bearings now. While rotating the rotor back and forth, slowly torque the wheelbearing nut to 50ft-lbs. Spin the rotor a few times in each direction and listen for unsmooth movement/crunching, etc. If all is well, loosen the wheel bearing nut untill it has released (about 90*). Now retighten the nut by hand. Too tight and you will burn up the bearing, too loose (like the way Chilton suggests) and your wheels will have too much movement making you feel like your upper balljoints are already toast!!
Now install your wheel bearing nut keeper, and cotter pin. Next, grease a light coat on the inside of the dust cap to catch any dust that might get in. Place a small bead of silicone around the outside groove like so. This will seal any dust/water from intruding...
Tap the dust cap on with a rubber/leather mallet. Now to the brake calipers and pads...
Place the removed caliper on the bench with the piston side facing up at you and the old pad still in. Crack the bleeder and place a rag over it so you don't shoot brake fluid everywhere. Hit the old pad so it pushes the piston back in the caliper. Fluid WILL shoot out of the bleeder, and brake fluid peels paint, be warned! After several hits, both of mine were free enough so I could push the pistons all the way in with my thumbs. Open the bleeder fully to make it easier and catch it in a container. Now you can install the new pads.
Support the outer pads on a hard surface like so. My bench was too bouncy so I had to use the wood stove. Tap the tabs down just a HAIR and keep fitting them on the caliper so the are tight. If they move around they can chatter later, driving you nuts...
Slather anti-seize on the sliding parts of your calipers after you wire brushed them to make sure they are smooth. Also put anti-seize on the clips that retain the caliper to the support. Make sure your support's sliding parts are equally as clean and slathered up as well. Now install your caliper support. You can also do this before the rotor goes on if you prefer like I did a few steps before, make sure you put loctite on the bolts...
Hook your caliper hoses back up. You should use 2 new copper washers on each side. Make sure not a skrid of dirt gets inside.
Put your wheel back on and torque them down to spec. Lower the truck down off the jackstands and shake everything around underneath. Bleed the brakes, and take it for a slow ride. Listen for clunking, wobbling, etc. Make sure you break in your brakes gently. 35mph-0 slowly 4 or 5 times. Then up to 45mph. Check your fluids frequently to make sure you don't loose any!!!
I got my truck aligned after. Sure enough the camber was out due to an alignment earlier with semi bad joints years ago. Enjoy good brakes and not wearing out your tires anymore! (At least the front ones ).
).
-Luke
Place the inner wheel bearing inside the clean, greased rotor/bearing assembly small diameter in first. Don't forget to do this before installing the wheel seal, or you'll be paying $16 for another one. Ask me how I know
.Place the wheel seal facing like so, with the rubber lip pointing in...
Drive the seal in with a block of wood and hammer. Make sure there is no sawdust or dirt that will fall off into the bearing while you knock it in. Tap slowly to make sure you drive the seal in straight. Drive it until its flush with the surface. IF you have a bad groove in your spindle even with a speedy sleeve, DO NOT drive it home yet! Reference another article in the sticky about this...
Inspect where your seal rides on your spindle. Mine is not as deep as it looks in this picture, it is mostly a superficial marking than a groove. I could barely detect it with my fingers. I'm told if your fingernail can get hung up on it, you should install a speedy sleeve. You still use the same wheel seal if you put a speedi sleeve on...
Grease the spindle all around. Make sure there is grease where the seal will be riding. Apply some grease on the installed seal as well. Reinstall the dust sheild and your cleaned, never-seized caliper support. Stage your rotor, freshly packed outer bearing, the special tabbed washer, and your wheel bearing nut by the truck. Have it all clean, and in easy reach. Now is a good time to clean the rotor with brake clean and wipe it with clean rags. Try not to get greasy prints on it any more...
Carefully slip the rotor back onto the spindle and keep it centered as you push it gently home. You don't want to over stretch/ruin your new wheel seal. While holding it centered, push the fresh packed outer wheel bearing (small diameter inboard) into the rotor and on the spindle. Now it is holding everything concentric. Slip the tabbed washer on making sure the tab is in the keyway on the spindle, and thread on the nut. You need to set the bearings now. While rotating the rotor back and forth, slowly torque the wheelbearing nut to 50ft-lbs. Spin the rotor a few times in each direction and listen for unsmooth movement/crunching, etc. If all is well, loosen the wheel bearing nut untill it has released (about 90*). Now retighten the nut by hand. Too tight and you will burn up the bearing, too loose (like the way Chilton suggests) and your wheels will have too much movement making you feel like your upper balljoints are already toast!!
Now install your wheel bearing nut keeper, and cotter pin. Next, grease a light coat on the inside of the dust cap to catch any dust that might get in. Place a small bead of silicone around the outside groove like so. This will seal any dust/water from intruding...
Tap the dust cap on with a rubber/leather mallet. Now to the brake calipers and pads...
Place the removed caliper on the bench with the piston side facing up at you and the old pad still in. Crack the bleeder and place a rag over it so you don't shoot brake fluid everywhere. Hit the old pad so it pushes the piston back in the caliper. Fluid WILL shoot out of the bleeder, and brake fluid peels paint, be warned! After several hits, both of mine were free enough so I could push the pistons all the way in with my thumbs. Open the bleeder fully to make it easier and catch it in a container. Now you can install the new pads.
Support the outer pads on a hard surface like so. My bench was too bouncy so I had to use the wood stove. Tap the tabs down just a HAIR and keep fitting them on the caliper so the are tight. If they move around they can chatter later, driving you nuts...
Slather anti-seize on the sliding parts of your calipers after you wire brushed them to make sure they are smooth. Also put anti-seize on the clips that retain the caliper to the support. Make sure your support's sliding parts are equally as clean and slathered up as well. Now install your caliper support. You can also do this before the rotor goes on if you prefer like I did a few steps before, make sure you put loctite on the bolts...
Hook your caliper hoses back up. You should use 2 new copper washers on each side. Make sure not a skrid of dirt gets inside.
Put your wheel back on and torque them down to spec. Lower the truck down off the jackstands and shake everything around underneath. Bleed the brakes, and take it for a slow ride. Listen for clunking, wobbling, etc. Make sure you break in your brakes gently. 35mph-0 slowly 4 or 5 times. Then up to 45mph. Check your fluids frequently to make sure you don't loose any!!!
I got my truck aligned after. Sure enough the camber was out due to an alignment earlier with semi bad joints years ago. Enjoy good brakes and not wearing out your tires anymore! (At least the front ones
).-Luke
03-08-2010, 05:03 AM
#5
Registered User
Join Date: Oct 2009
Location: Claymont, Del and Horsham, PA
Posts: 1,830
Likes: 0
Received 1 Like
on
1 Post
Good job on the write-up, something i've done more than a few times, and its nice to see somebody else does the same steps, including pressing in the first upper ball mount and added leverage to bust loose the hard to get to bolts ;-)
03-08-2010, 12:13 PM
#6
Registered User
it's an interesting and fun task. it's nice to know how it all goes together once you're done. and having a big sense of pride knowing you did it yourself and saved hundreds of dollars by doing so rather than paying a shop to do it. i spent a good $1300 to rebuild the entire front suspension and i know i saved at least $500 on labor by doing it myself. i've got a good number of pictures from the project. and after 2 years, my front pads still had 3/4 of the material left. wheel bearings and races were in great shape and all i replaced was the wheel seal. in the end, as stated before, i'm glad i did it on my own. especially since i knew i had the ability to. good little write up btw!

Trending Topics
03-08-2010, 08:30 PM
#8
I can take everything apart with a torch.That took a while to write and put together. You did a great job.
03-08-2010, 08:56 PM
#9
Registered User
Join Date: Apr 2007
Location: Southern New Jersey
Posts: 4,062
Likes: 0
Received 0 Likes
on
0 Posts
There is nothing that cant be fixed with a torch a welder and a hammer. If that dosent work just get a bigger hammer lol...
03-08-2010, 08:57 PM
#10
Registered User
Thread Starter
Join Date: Nov 2007
Location: Maine
Posts: 1,816
Likes: 0
Received 0 Likes
on
0 Posts
Wish I had a heat wrench... thanks for rubbing it in Rich...
And with that, I'm gonna head below deck to my cabin and hit the rack...
03-09-2010, 07:57 AM
#12
Registered User
Thread Starter
Join Date: Nov 2007
Location: Maine
Posts: 1,816
Likes: 0
Received 0 Likes
on
0 Posts
Part numbers and price list (March 2010):
NAPA Wheel seals (4000# axle): NOS 22835 $15.29ea (2 req'd)
NAPA Brake pads (middle quality): SS SS7019M $42.99/set (1 req'd)
Advanced Auto Parts:
Moog Upper balljoints: K7082 $91.99 ea (2 req'd)
Moog Lower balljoints: K7053T $94.99 ea (2 req'd)
I got my balljoints for 15% off because the manager honored their online sale. Most these parts can be had from Rockauto.com also, but I wanted to be able to return them to a local store for their lifetime warranty. I've been told for the balljoints to ONLY get Moog. Everything else you can go cheaper on, but spend the money for the good balljoints. BTW, they are about $75 each on rockauto, so you are looking at $300, not $400 like my price list.
Fun fact: I was quoted $700 to have only my balljoints done and that was probably with inferior, $20 balljoints all around. Even with me getting the good ball joints, brakes, and wheel seals, I saved over $300 doing this myself. The reality is I probably saved closer to $500.
 10-11-2011, 01:05 PM
#15
Registered User
Join Date: Jun 2008
Location: Okotoks, Ab. Canada
Posts: 81
Likes: 0
Received 0 Likes
on
0 Posts
Sometimes "trial and error" is the best teacher! I had one upper that we broke a 4ft strong-bar on. Even after welding the bar we still had to put another 3ft snipe on to get the ball-joint to break loose! The other side was a breeze, came out with no challenge at all! We never did get the grease cups to seat properly (over a year ago) so I figure this winter I'll be doing this all again!..... sigh