1992 W250 Resurrection/Modding
 10-31-2014, 07:41 AM
#91
Registered User

I am in the same boat. its supposed to rain today so I have some inside projects to do. I have two HVAC controls to combine and my interment panel to finish up.
 11-05-2014, 10:27 PM
#92
Registered User
Thread Starter
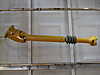
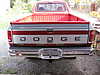
Well it was a banner weekend for the ole' Dodge. I rebuilt the front drive shaft with Moog joints...and painted it yellow! I also fixed the tailgate and put some paint on it. I also put the T/C skid plate back on.
Last edited by MrFusion; 11-05-2014 at 10:37 PM. Reason: forgot something
 11-05-2014, 11:16 PM
#94
Registered User
Thread Starter
I used a piece of HDPE plastic out of a 55 gallon plastic drum to make a bushing in the passenger side tailgate hinge pocket. It's a little too thick so I may try to make another one and sand it down a bit.
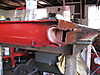
After a little bit of tweaking I got the latches adjusted to open correctly when the handle was pulled. I also decided to slap some paint on it to make it pretty. I ALMOST painted it Equipment Yellow but decided not to. I found that the latch system is much easier to work on while the tailgate is attached to the truck. I also replaced the stupid, stripped out giant Philips head screws that hold the handle in with regular hex head bolts.
After a little bit of tweaking I got the latches adjusted to open correctly when the handle was pulled. I also decided to slap some paint on it to make it pretty. I ALMOST painted it Equipment Yellow but decided not to. I found that the latch system is much easier to work on while the tailgate is attached to the truck. I also replaced the stupid, stripped out giant Philips head screws that hold the handle in with regular hex head bolts.
11-06-2014, 07:18 AM
#95
Registered User
 Looks like you have been busy. looks good.
11-24-2014, 12:45 AM
Looks like you have been busy. looks good.
11-24-2014, 12:45 AM
#96
Registered User
Thread Starter
I installed a fuel pressure gauge today. I used a TorkTek banjo bolt/snubber and a NoShok 0-30 PSI fuel gauge. The gauge is mounted directly to the snubber. Its reading 4-5 PSI at idle. Once I get the truck inspected and start doing performance upgrades installing a low pressure piston pump is pretty high on the list.
12-02-2014, 01:40 AM
#97
Registered User
Thread Starter
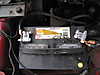
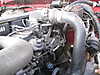
I've been doing little stuff to the W250. I finally installed Jim Lane's upgraded headlight harness. I also replaced the old beat up and not really functional battery terminals with military style terminals. I cut the old ones off, stripped the insulation off of the ends, and soldered on copper terminal lugs. I know they should be crimped but I don't have access to a proper crimper. Seems to work pretty well.
12-02-2014, 09:16 AM
#98
Registered User
I've been doing little stuff to the W250. I finally installed Jim Lane's upgraded headlight harness. I also replaced the old beat up and not really functional battery terminals with military style terminals. I cut the old ones off, stripped the insulation off of the ends, and soldered on copper terminal lugs. I know they should be crimped but I don't have access to a proper crimper. Seems to work pretty well.
12-02-2014, 06:38 PM
#100
Registered User


 12-04-2014, 09:57 PM
#103
Registered User
Thread Starter
Here's a pic of the military battery lugs. The thing I really like about them so far is that once they're on the battery you never have to take them off in order to add or remove cables. My experience with lead terminals is that, after being removed and re-tightened several times they stretch and break and need be replaced. The bolt on the back solves that problem. I repositioned the negative cable since i took the picture about 45 degrees toward the firewall.
12-04-2014, 10:10 PM
#104
Registered User
Thread Starter
Here's a pic of the fuel pressure gauge with the truck running at idle. The needle vibrates around 4 PSI.
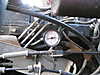
This is a pick of the gauge from the front DS corner of the truck.
This is a pick of the gauge from the front DS corner of the truck.
